Tutorial: Container-based Inference Pipeline#
This tutorial demonstrates the Docker-based deployment of PyRaDiSe-based auto-segmentation solutions using the “DL-Model Inference Pipeline” example. In addition, it provides helpful resources and explanations facilitating straightforward dockerization of existing or new pipelines.
The auto-segmentation solution deployment is typically challenging due to restricted access to the target machine or limited hardware. Furthermore, target machines may be used during working hours by the owner or contain confidential data that should not be accessible by the developer. In order to circumvent those challenges, Docker containers are a neat and robust solution. The advantages of using Docker containers are manifold and include, for example, machine-independent development, built-in image versioning, easy deployment via container registries, and machine-independent image testing. For more information, we refer to the official Docker documentation.
This tutorial is not directly executable but explains how to build an auto-segmentation Docker image using PyRaDiSe. In addition, we provide an external GitHub repository with a demo project based on the “DL-Model Inference Pipeline” example. This demo is locally executable using the example model and data provided and contains a web interface that
can be called via the URL http://localhost:4000.
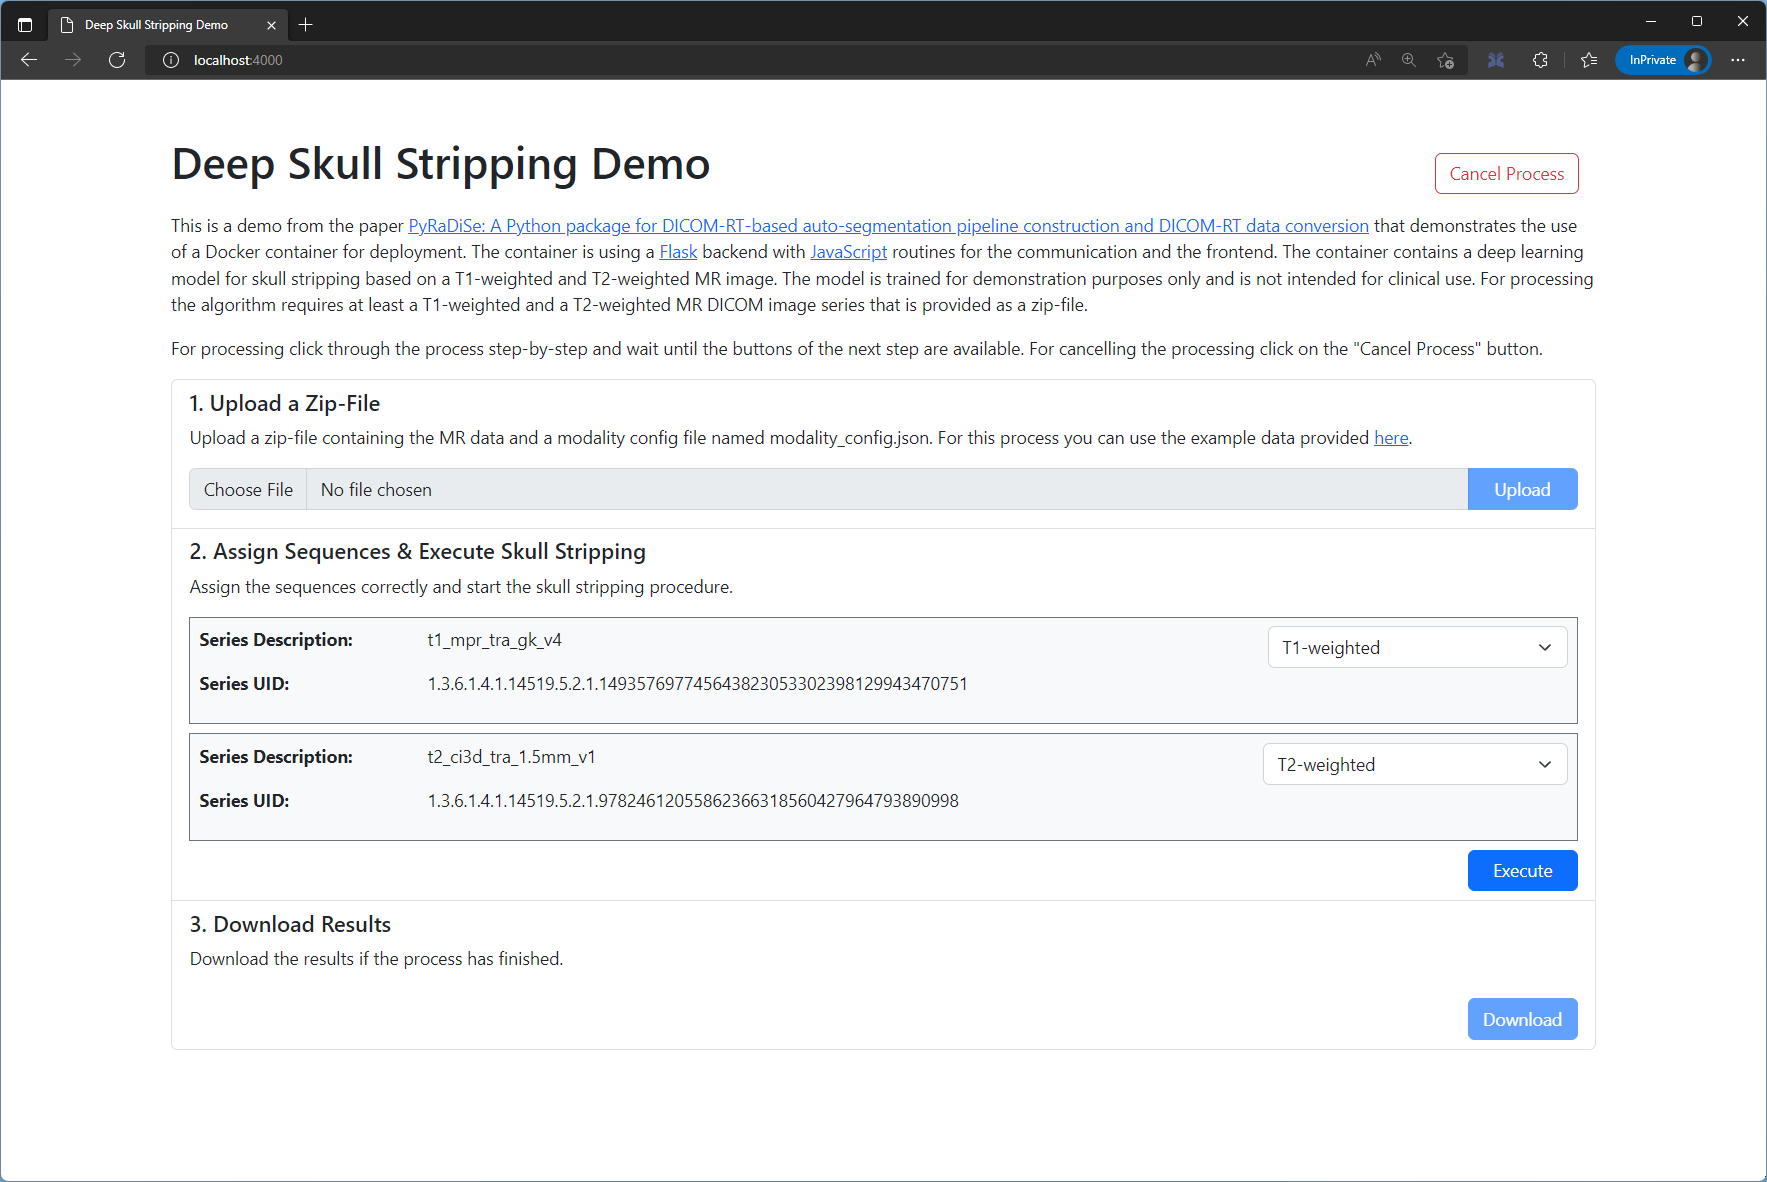
Web interface of the demo project.
Workflow Overview#
The following workflow provides an overview over the steps that need to be taken to develop a Docker-based auto-segmentation solution:
Develop Standalone Auto-segmentation Solution#
In general, developing an auto-segmentation solution should start with implementing a processing pipeline on the local machine with minor consideration of the future deployment as a container. Beforehand the segmentation model should be trained to be tested with the pipeline implementation. We recommend separating the training and inference projects such that the size of the auto-segmentation pipeline is minimal. For the following sections, we assume that a trained model exists.
For the implementation, the developer must consider the type of interaction and communication technology the final product should employ (e.g., API, GUI, web interface). Depending on the communication technology and the interaction with the user, the project structure may be different. Besides this, the goal of the implementation should be to develop a robust and well-structured solution that works with the expected data and implements all the functionality required (see Structuring your Project). A proper project structure and a robust pipeline implementation will make dockerization straightforward.
Install Docker with GPU Support#
Typically, deep learning model inference runs on GPU to speed up processing and reduce waiting times for the user. However, Docker containers do not automatically detect potential GPUs built into the host computer and lack the necessary drivers for GPU access. Furthermore, Docker does not add GPU visibility to containers by default, so access must be explicitly granted.
In order to use GPUs for deep learning model inference, the host system must be configured correctly, requiring extra effort. The necessary configuration steps are operating system-dependent, and reasonable explanations for achieving GPU support with Docker are publicly available. For configuring the host system, follow the appropriate instructions:
Select the explanation for your operating system:
Apple OS X: Not supported (No CUDA support for OS X)
Dockerize the Project#
After preparing the developer’s computer for dockerization with GPU support, one needs to write an appropriate Dockerfile containing the instructions the Docker daemon has to follow for building the container. If one is unfamiliar with Docker, reading an appropriate tutorial may be helpful before starting to write a Dockerfile (e.g., Docker docs, Dockerfile Tutorial 1, Dockerfile Tutorial 2).
For dockerization, one typically starts with a Python base image containing a directly usable Python installation. Then, all necessary packages, such as PyRaDiSe, are installed, and the local project content gets copied into the container image. Be aware that some components may need additional Linux packages missing in a typical container, such as the X11 library that VTK requires.
At the end of the Dockerfile the developer should expose specific ports for TCP access, especially when a web interface is used. Furthermore, the developer should restrict access to the container to prevent potential attacks by appropriate measures, such as removing the login for the root user, as demonstrated in the Dockerfile below. We also encourage developers to test their container image for vulnerabilities with, for example, Snyk to render the container maximum secure. After these configuration steps, the entry point must be set, which is called upon container start. Depending on the type of communication, the design of the entry point varies.
FROM python:3.9-slim-bullseye

# copy the requirements file
RUN mkdir -p /app
COPY requirements.txt /app/requirements.txt

# create the necessary directories
RUN mkdir -p /app/data/input && \
    mkdir -p /app/data/scratch && \
    mkdir -p /app/data/output && \
    mkdir -p /app/env && \
    mkdir -p /install

# establish the python virtual environment
# note: opencv-python must be installed separately due to limitations of the package
ENV VIRTUAL_ENV=/app/env/
RUN python3 -m venv $VIRTUAL_ENV && \
    $VIRTUAL_ENV/bin/pip install --upgrade pip && \
    $VIRTUAL_ENV/bin/pip install --no-cache-dir -r /app/requirements.txt && \
    $VIRTUAL_ENV/bin/pip install --no-cache-dir opencv-python-headless

# VTK requires the X11, OpenGL, and XRender library
RUN apt-get update -y && \
    apt-get install -y libx11-dev libgl1-mesa-glx libxrender1

# copy the application
COPY . /app

# set the necessary environment variables
ENV INPUT_DATA_DIR=/app/data/input
ENV SCRATCH_DATA_DIR=/app/data/scratch
ENV OUTPUT_DATA_DIR=/app/data/output
ENV MODEL_DIR_PATH=/app/data/model/

# set inference related environment variables
ARG BATCH_SIZE=4
ENV BATCH_SIZE=$BATCH_SIZE
ENV CUDA_VISIBLE_DEVICES=0

# add a non-privileged user, change the ownership and mode and hinder the root login
RUN groupadd -r work && \
    useradd -m -r -g work work && \
    chown -v -H -R work:work /app/data && \
    chown -v -H -R work:work /app/main.py  && \
    chown -v -H -R work:work /app/entrypoint.sh && \
    chmod -R 766 /app/data && \
    chmod 777 /app/data/output && \
    chmod +x /app/entrypoint.sh && \
    chsh -s /usr/sbin/nologin root

# expose port 5000 for the web interface
EXPOSE 5000

# set the user work as default
USER work

# set the work directory
WORKDIR /app

# set the entrypoint
CMD ["/bin/bash", "./entrypoint.sh"]
Tips for Dockerization#
Dockerizing a project can be challenging, especially when errors are not obvious or functions do not behave as expected. Thus, we provide some tips originating from our experience working with Dockerfiles.
Start with a simple Dockerfile and add details after first builds were successful.
Check the application without Docker for identifying potential different error causes.
Check paths carefully
Add security features at the end of the development process
Read the Docker docs carefully when searching for answers
Check vulnerability with a vulnerability scanner before deployment
Ask questions in online forums (e.g. Stackoverflow)
Test Image Locally#
After building the docker image successfully, one typically tests the image by clicking through the functionality because operating system differences and differing settings may cause errors that are often corrected within minutes and causes hours of work when the container image is deployed. For these tests, the usage of different data is recommended to test the auto-segmentation pipeline’s robustness.
Store Image in Registry#
Docker images are best deployed via registries that host the images to be accessible for specific user groups. Besides public registries, such as the Docker Hub, ones with restricted access (e.g., Azure Container Registry) allow the distribution of images to a limited audience. Registries with restricted access may be helpful when developing auto-segmentation pipelines for a specific vendor or a specific clinic.
Pushing a container to a registry is achieved straightforwardly via the console using the appropriate commands explained here.
Automate Deployment Pipeline#
Because building, pushing, and updating containers incorporate the execution of a multitude of commands in a pre-defined order, automating these procedures can dramatically speed up the work. Furthermore, automation may also be helpful for testing and notifying users that a new version of the container image is available. For automating Docker-related and build process-associated tasks (so-called Continuous Integration (CI) and Continuous Delivery (CD)), a wide variety of powerful tools are available that allow for secure, reproducible, and extensive automation. The choice of a specific tool depends mainly on the user’s preferences, and the toolchain operated. The following tools are widely known and applied in industry for such tasks:
Deploy to Target Machine#
If one has followed all the previous steps, the container image is now ready to be deployed to the target machine. Depending on the setup of the target machine, the Docker daemon must be installed and configured correctly to run the container (see step “Install Docker with GPU Support”). After the target machine is set up, the container image can be pulled from the registry and run using Docker’s pull and run commands, respectively.